OpenAI and Google ready to launch new AI models: is Gemini 2.0 and Project Astra about to revolutionize the market?
Gemini 2.0 and the new AI landscape
In recent days, speculations about the imminent arrival of Gemini 2.0 have sparked interest in the tech world. Until a few days ago, there was talk of a possible ChatGPT-5 from OpenAI, a rumor denied by CEO Sam Altman. Now, attention has shifted to Google, with a potential debut of Gemini 2.0 within a couple of months. But what could this new version bring?
Expected evolution and improvements
The last update of Gemini, version Gemini 1.5, dates back to February. With the upcoming release of 2.0, experts anticipate improvements such as more accurate responses, support for longer inputs, faster processing, and enhanced reasoning and coding capabilities. These updates would result in an overall better user experience, making artificial intelligence even more versatile and powerful.
Competition and innovation in the AI field
The potential release of a new OpenAI or Google model by the end of the year confirms the trend of continuous innovation in artificial intelligence. Recent weeks have seen new video generation tools, image AI enhancements, and customized search features. Meanwhile, Apple Intelligence will soon be available to millions of iPhone users in the U.S., fueling strong competition in the industry.
Expectations for Project Astra and Google’s role
The AI world is also eagerly awaiting Project Astra from Google, introduced at Google I/O 2024. With multi-input and multi-output capabilities, Project Astra aims to be an even more advanced and natural assistant, taking user interaction to the next level.
The popular Q&A platform, launched in 2010, announces its official shutdown by the end of the year.
The closure announcement: the end of Ask.fm
The well-known anonymous Q&A service, Ask.fm, has officially announced its shutdown scheduled for December 1, 2024. Founded in Latvia in 2010 as an alternative to similar platforms, Ask.fm once reached a peak of 180 million registered users. However, over time, the platform experienced a steep decline in participation, leading its management to the challenging decision to end the service.
The reasons behind Ask.fm’s shutdown
The choice to discontinue the service reflects the evolving social media landscape and modern user expectations. “Unfortunately, our ‘Ask and Answer’ platform no longer meets current needs,” states the official release. This acknowledgment highlights the shift in user preferences, which now lean towards platforms offering more dynamic interactions.
End of registrations and gradual removal of features
Since October 24, Ask.fm has stopped allowing new users to register, and functions will be progressively disabled until the final shutdown. Additionally, the platform has assured users about managing their personal data: all information will be deleted, although a complete removal may take up to 90 days.
A thank you to Ask.fm’s users
Ask.fm‘s managers concluded their message with thanks to everyone who participated, showing curiosity and honesty in their answers. “Thank you to all who had the curiosity to ask and the courage to give sincere answers.”
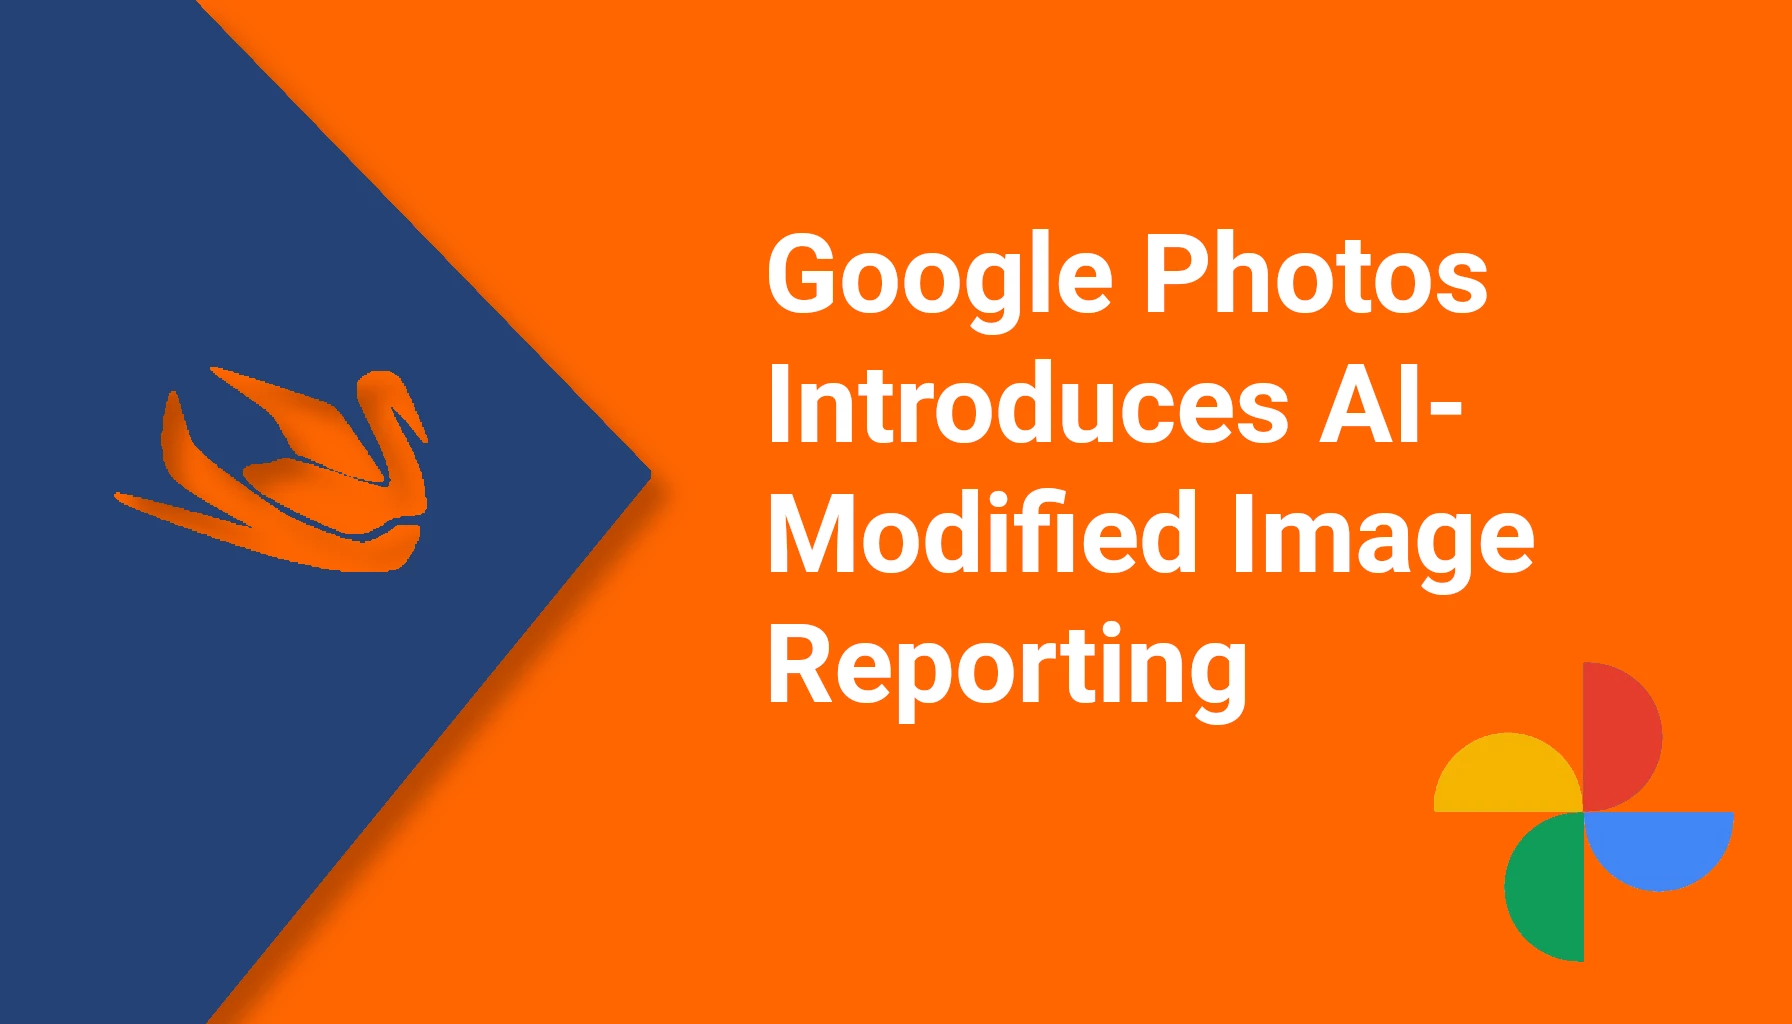
A new feature on Google Photos will help users distinguish images that have been edited using artificial intelligence, ensuring transparency and accountability.
Google Photos and the new transparency on AI edits
With the rise of AI-powered editing tools , Google has announced a new level of transparency on Google Photos. This tool, which will be added to the platform in the coming weeks, will allow users to see when an image has been edited using AI technologies .
The Importance of Transparency in a Digitally Manipulated World
Today, many technology companies are adopting generative AI capabilities to edit images and videos in innovative ways. However, it is becoming essential to let users know when content has been adapted with these tools. Google has decided to follow this path by introducing a visual label on Google Photos that will notify users of AI -made edits , so they can better understand the nature of the images they see.
How AI Image Flagging Works on Google Photos
Google Photos already recorded changes in image metadata , but with the new feature, a more prominent note will be shown to indicate when a photo has been adjusted using AI tools . Specifically, a section called “ AI Info ” will appear in the image details , providing specific information about the AI tool used, such as the Magic Editor or other advanced video editing features recently introduced.
Advanced editing and transparency features for the user
This new Google Photos feature lets users know if an image has been altered with generative AI or created using features like “ Best Take ” — a mode that lets you create composite images without the use of AI . Transparency about the source and visual changes will allow users to make more informed choices when interacting with digital content.
Google’s Corporate Responsibility in Using AI
Google recognizes the importance of responsibility in releasing AI tools to the public. For this reason, the company has chosen to join the Coalition for Content Provenance and Authenticity (C2PA) , an initiative that aims to create global standards for transparency in digital content. The new flagging feature in Google Photos reflects Google’s commitment to using AI ethically , following the company’s AI Principles , and offers a first step toward greater transparency in the field of digital editing .
This new feature represents an important step towards a more conscious and responsible use of artificial intelligence in image editing, ensuring that Google Photos users have a clear and immediate understanding of the content they are viewing.
WordPress comments can foster engagement and community, but not every site or post benefits from them. Some wordpress sites may wish to eliminate spam comments, while others simply prefer to keep things focused on content without distractions. If you’re wondering how to disable comments in WordPress, you’ll find several options, from stopping them site-wide to turning off comments on specific posts or pages.
There are several strategic reasons why site owners and content creators might choose to disable comments on their WordPress site. While comments can encourage engagement, they aren’t always beneficial, depending on the site’s goals, target audience, and content style. Here’s a deeper look at why turning off comments could be advantageous:
Reducing Spam and unwanted content
One of the most common reasons to disable comments in WordPress is the sheer volume of spam comments many sites receive. Without constant moderation, spam can clutter the comments section with irrelevant, offensive, or harmful content, harming the credibility of your site. Spammers often target WordPress sites for backlink building, filling comment sections with links and low-value comments. By disabling comments, you eliminate the need for time-consuming moderation and reduce the risk of malicious links or scams appearing on your site.
For businesses, this move can be particularly strategic, as any questionable content might tarnish a professional image. Even with spam filters or plugins, a determined spammer may still find ways to bypass defenses, making complete comment removal a more effective solution.
Streamlining site management and content focus
Comments can require regular attention, which can be resource-intensive. For site owners or small teams who manage multiple aspects of their WordPress site, managing and responding to comments may not be practical. Disabling comments can help save time and streamline site management, allowing more focus on content creation, design, and optimization.
In addition, certain types of content simply don’t benefit from comments. Blogs with instructional guides, company announcements, or evergreen resources may prefer a clean, distraction-free interface where readers can focus solely on the content. This approach can also be helpful for e-commerce sites, portfolios, and business sites where the primary goal is to highlight products, services, or achievements without additional input.
Preventing negative or Off-Topic discussions
Some topics naturally attract debate or disagreement, especially when dealing with polarizing or controversial subjects. By choosing to disable comments, site owners can prevent potentially divisive or negative interactions from detracting from the intended message of a post. This is especially beneficial for brands and businesses that want to avoid public disputes or negativity within their digital spaces.
While respectful conversation can be valuable, off-topic discussions often emerge in comment sections, steering away from the original purpose of the post and potentially leading readers off course. Removing the comment feature helps ensure that content stays focused, reducing the risk of reader distraction or unintended tangents.
Improving site performance and load times
Every element on a webpage affects its performance, and comments are no exception. On large sites or sites with highly trafficked posts, pages, or media, a comment section can contribute to slower load times, as it adds additional content that the server must load. Pages with extensive comment threads are particularly at risk, as they require more server resources to display the comments in real-time.
For sites focused on performance and SEO, disabling comments may provide a slight boost to page speed, which can positively impact search engine rankings. Additionally, reducing load times improves the user experience, especially for mobile users who may have limited bandwidth.
Aligning with brand or content strategy
Some brands or creators may simply find that a comment-free site aligns better with their overall goals and strategies. For example, news outlets, official brand blogs, or portfolio sites often aim to present authoritative information, choosing instead to encourage feedback via social media channels where conversations are more accessible and easier to monitor. This allows site owners to guide discussions in a more controlled environment, managing engagement in spaces where they can better monitor brand perception.
Content-driven sites, such as e-commerce websites or recipe blogs, may find that comments are less necessary since product descriptions or instructional content is typically straightforward. Disabling comments in such cases helps to maintain a clean, brand-focused site without additional commentary that may distract or detract from the brand’s messaging.
Enhancing security and protecting data privacy
Lastly, comments on WordPress sites can sometimes create security vulnerabilities, as hackers may exploit comment forms for SQL injections or other cyber threats. Disabling comments eliminates this entry point, especially for sensitive sites that prioritize security, such as financial services, healthcare providers, or educational institutions.
Beyond security, some sites may have privacy policies or regulatory requirements that discourage or limit public interactions on their platforms. For example, sites dealing with user data or sensitive subjects may choose to remove comments to avoid collecting or displaying user data publicly, adhering to stricter data privacy standards.
Disable comments for future posts
To turn off comments in WordPress for new posts, you can make adjustments in the settings to ensure that comments are not allowed on any future content you publish.
Begin by accessing the WordPress dashboard.
Navigate to Settings > Discussion.
Look for the option labeled Allow people to submit comments on new posts and uncheck it.
Scroll to the bottom of the page and click Save.
This change will only apply to new posts, so if you want to remove the comment option on existing posts or pages, you’ll need to use additional settings or plugins.
How to disable comments on specific posts or pages
Disabling comments on a specific post or page is an easy process if you only need this change for certain areas of your WordPress site.
Access the WordPress dashboard and go to Posts > All Posts or Pages > All Pages, depending on where you want to apply the change.
Hover over the post or page you wish to edit and click on Quick Edit.
Under the comment status section, uncheck Allow Comments.
Click Update to save changes.
This way, you can keep comments on specific posts or pages and disable them where they aren’t necessary.
Using bulk edit to disable comments on multiple posts
The bulk edit function is perfect if you want to disable comments on a group of posts at once.
In the WordPress dashboard, go to Posts > All Posts.
Select the checkboxes next to the posts where you want to disable comments.
From the Bulk Actions dropdown, select Edit and click Apply.
In the comment settings section, choose Do not allow from the comments dropdown.
Click Update to apply changes.
This will quickly turn off comments for multiple posts simultaneously, making it an efficient solution for larger sites.
Disable comments on media and custom post types
By default, WordPress allows comments on all posts, pages, and media files, but some users may want to turn them off for custom post types or media files as well.
Go to Settings > Discussion in your WordPress dashboard.
Scroll down to find settings related to specific post types, such as posts pages or media.
For media files, consider using a plugin if the option isn’t available in the discussion box.
Plugins like Disable Comments can be particularly useful for those looking to turn off comments across all custom post types or when WordPress settings don’t cover specific cases.
Using WordPress Disable Comments plugin for more control
The Disable Comments plugin is popular among WordPress users who want to disable comments across the entire site or on certain content types without manually adjusting each setting.
In the WordPress dashboard, go to Plugins > Add New.
Search for Disable Comments and click Install Now, then Activate.
In the plugin’s settings, you’ll be able to choose options to disable comments site-wide, on posts, pages, or media.
Using a plugin offers greater control if you need to remove comments in WordPress consistently across various post types.
How to hide existing comments
If you’ve decided to turn off comments but have existing ones on your site, hiding or deleting them can streamline your content.
From your WordPress dashboard, go to Comments and select the comments you want to delete.
You can bulk delete by selecting multiple comments and choosing Move to Trash under Bulk Actions.
If you only want to hide the comments without deleting them, a plugin like Simple Comment Editing or a custom CSS solution can help.
Questions and answers
How can I disable comments on all posts? Use the Disable Comments plugin or adjust bulk edit options for multiple posts.
Can I turn off comments for future posts only? Yes, go to Settings > Discussion and uncheck Allow people to submit comments on new posts.
How do I disable comments on custom post types? Some themes offer options for custom post types, or you can use a plugin to manage these settings.
How can I remove comments from specific posts? Use Quick Edit under the post or page settings to disable comments on specific posts.
What is the best plugin to disable comments in WordPress? The Disable Comments plugin is popular for managing comments across the site.
Can I hide existing comments without deleting them? Yes, you can use CSS or plugins like Simple Comment Editing to hide them.
Is there a way to bulk disable comments on pages? Yes, go to All Pages, select multiple pages, and use Bulk Actions to turn off comments.
How can I turn off comments for media files? Plugins like Disable Comments allow you to turn off comments on media files across your site.
What happens if I disable comments on old posts? Disabling comments will close them for all users, but the existing comments may still be visible.
How do I change comment settings on my WordPress site? Access Settings > Discussion in the WordPress dashboard to manage comment settings.
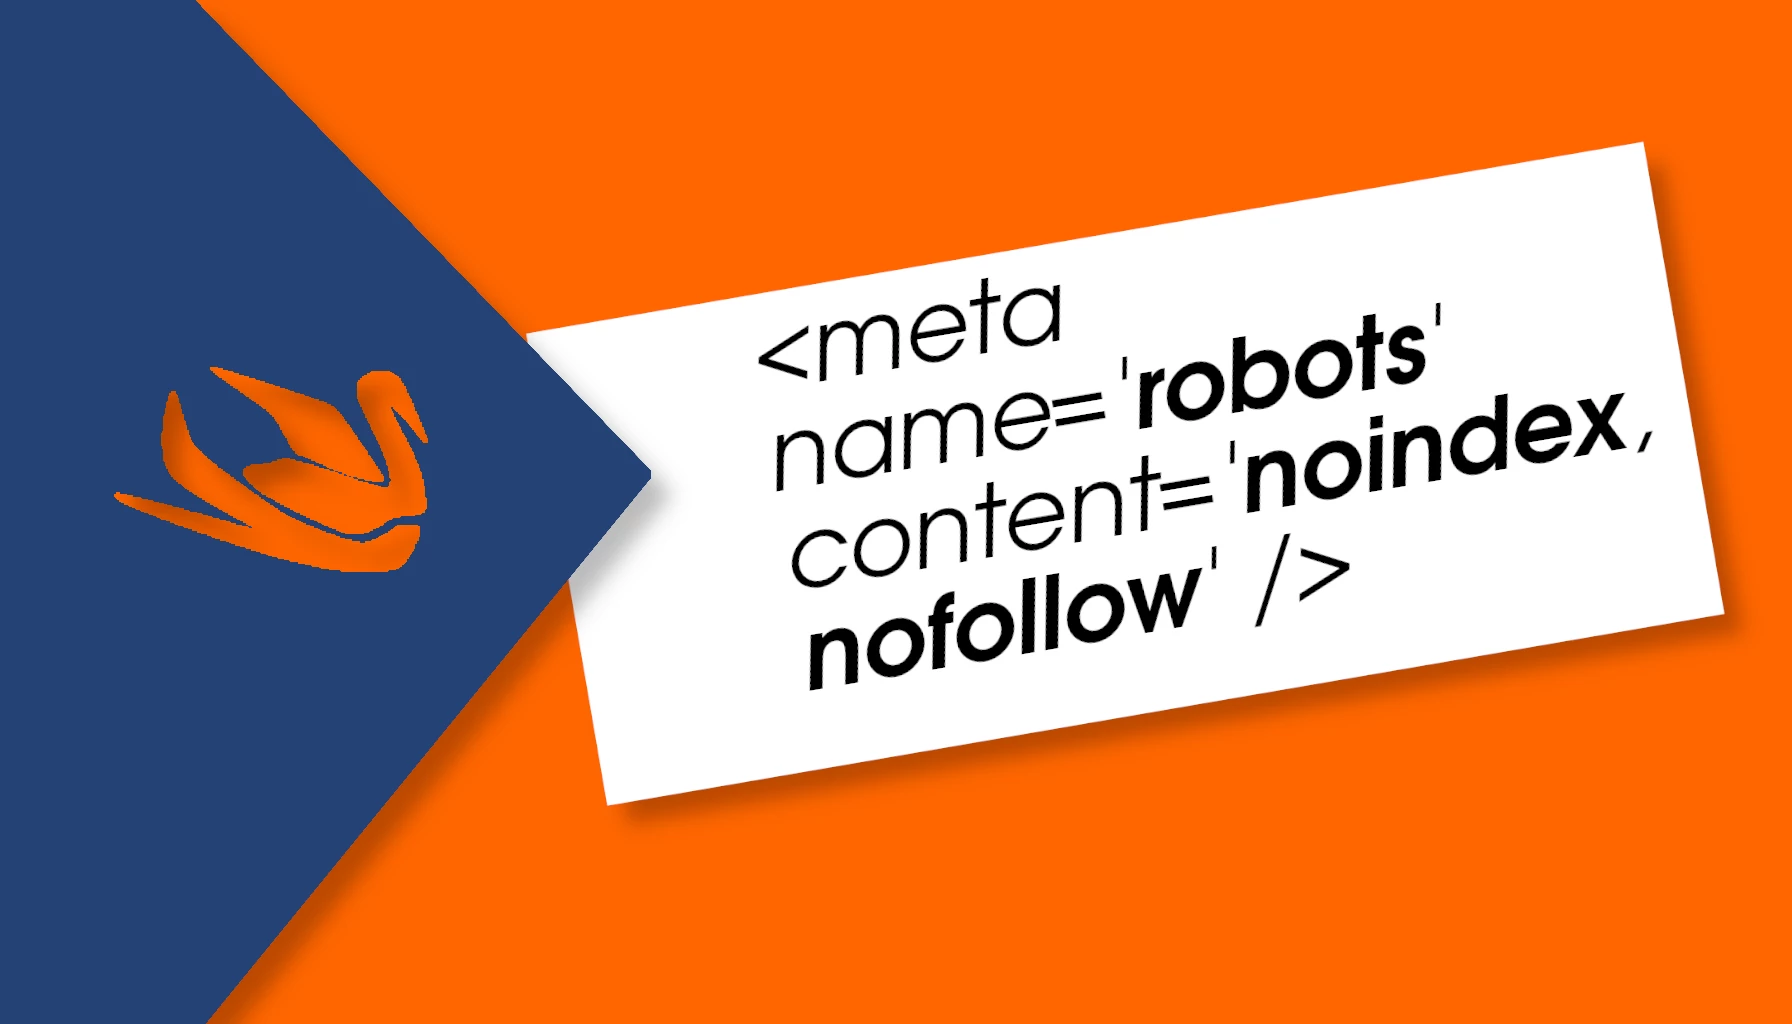
When it comes to search engine optimization (SEO), one of the fundamental aspects to consider is the control over the indexing of a website ‘s pages . There are times when it may be necessary to hide certain pages from search engines, such as login pages, restricted pages, or sections under development. This is possible thanks to the robots meta tags , in particular the noindex and nofollow tags.
In this specific case, the client’s website, which recently requested my SEO services , was unable to be indexed in Google. After a quick check of the code and a further check in Google Search Console, we found that the robots meta tag within the pages showed this code:
<meta name='robots' content='noindex,nofollow' />
Of course, Google did not index the pages accordingly.
In this article, we will see how to add or remove noindex tags in WordPress , using different solutions. We will also discuss the nofollow tag and how both tags can affect the indexing of your site’s pages .
The WordPress robots noindex tag is an attribute that is inserted into the HTML code of a page and is used to prevent a page of the site from being indexed by search engines.
What is this tag used for? It is often used for:
Reserved pages (login, user pages)
Duplicate content
Temporary or under construction pages
Resources that should not be visible in search results
How to Add Noindex Tag in WordPress
There are several methods to add noindex tags in WordPress . Here are two of the most common:
WordPress Settings
In your WordPress admin panel, click on “ Settings ” then “ Reading ” and scroll down to “Search Engine Visibility”. Click on “Discourage search engines from indexing this site”.
In the code, the robots meta tag will be changed to “noindex,nofollow”.
Conversely, uncheck the checkbox to remove “noindex”.
Using an SEO plugin like Yoast SEO
Yoast SEO is one of the most used plugins for managing SEO on WordPress. One of its main features is the ability to manage robots meta tags , including noindex and nofollow .
Install Yoast SEO : If you haven’t already, install and activate Yoast SEO.
Accessing a single page : Go to the Pages or Posts section and edit the page where you want to add the noindex tag.
Yoast SEO Section : Scroll down until you find the Yoast SEO section.
Advanced Settings : Under the “Advanced” tab, you will find the option “Allow search engines to show this page in search results?”. Select “No” to add the noindex tag.
Save Changes : After selecting the option, save the page. Now the tag will be added to the source code of the page.
With this method, your site page will be excluded based on the WordPress noindex tag and will not appear in search results.
Manually editing the HTML code
If you prefer to edit the HTML code directly , you can manually insert the meta name tag robots content noindex nofollow WordPress in the head section of the page .
Access your WordPress theme : Go to Appearance > Theme Editor.
Editing the header.php file : Find and edit the header.php file. This file contains the head section of the page .
Adding the meta tag : Insert the following code inside the <head> tag of the page you want to exclude from indexing:
<meta name="robots" content="noindex, nofollow">
This will prevent both the indexing of the page and the following of links on it.
This method is more technical, but gives you full control over where and how to place your robots meta tags .
How to Remove Noindex Tag in WordPress
If a page has previously been excluded based on the WordPress noindex tag , you may want to remove this tag in the future to index the page . Again, Yoast SEO and manually editing the source code are two valid options.
Remove noindex tags with Yoast SEO
Go to the page in question .
Go to the Yoast SEO section .
Advanced Settings : In the Advanced tab, set “Allow search engines to show this page in search results?” to “Yes”.
Save the page .
Now the page will be indexed by search engines and may appear in the results.
Manual Edit
If you manually inserted the noindex tag , you need to remove it from the page’s HTML code . Go back to the header.php file or the page template and delete the line containing the tag:
<meta name="robots" content="noindex, nofollow">
Alternatively, you can change it to:
<meta name="robots" content="index, follow">
This will allow search engines to index your pages and follow internal and external links.
How to remove nofollow tags in WordPress
The nofollow tag is used to tell search engines not to follow links on a page or to pass authority from an internal or external link to other pages on other websites.
If you have used the nofollow tag for a specific link and want to remove it, there are two ways:
SEO Plugins like Yoast SEO
Similar to what we saw for the noindex tag , you can use Yoast SEO to manage the nofollow rel attribute .
Editing the link : Go to the page and find the link you nofollowed .
Changing settings : In the link management window, uncheck the “Add rel=”nofollow” to links” option.
Save changes .
Manually editing the code
To remove the nofollow tag manually, you need to access the HTML code of the page and find the link that contains the attribute:
<a href="URL" rel="nofollow">Link Anchor Text</a>
Remove the rel=”nofollow” attribute , leaving the link intact:
<a href="URL">Link Anchor Text</a>
This will allow search engines to follow the link and pass SEO value to the linked site.
Difference between noindex and nofollow
A common mistake is to confuse the two tags. Noindex is used to prevent search engines from indexing your pages , while nofollow is applied to links and tells search engines not to follow them. You can use these tags together or separately, depending on your needs.
For example, a typical meta name robots content noindex follow indicates that the page will not be indexed, but the links on it will be followed by search engines.
Other solutions to control indexing
In addition to the robots meta tags , you can control the indexing of your pages using the robots.txt file , which tells search engines which sections of your website should not be crawled.
For example, if you want to exclude a certain page from all search engines, you can use this code in your robots.txt:
User-agent: *
Disallow: /page-to-exclude/
However, the robots.txt file does not always guarantee that a page will be excluded from search results; for this reason, it is often recommended to combine the use of meta name robots content noindex nofollow with the robots.txt file .
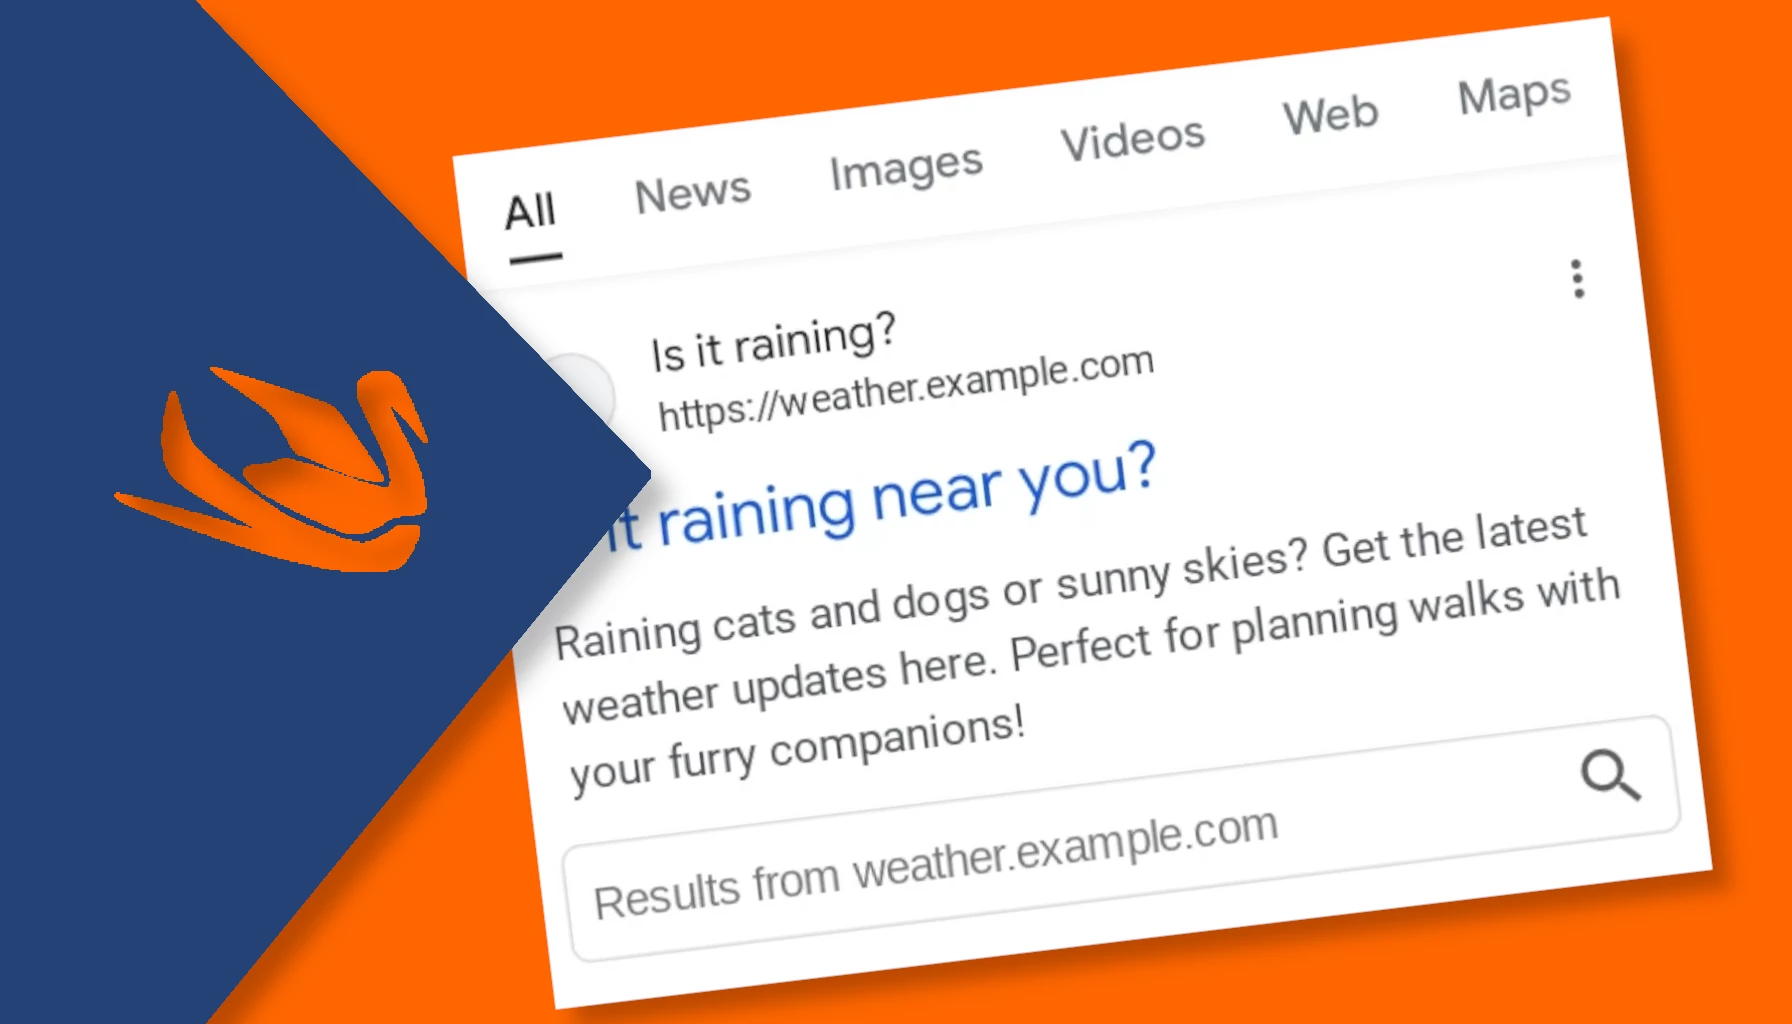
Starting November 21, 2024, Google will remove the sitelinks search box from search results to simplify the user experience.
The End of an Era: Saying Goodbye to the Sitelinks Search Box
After more than a decade since its introduction, Google has announced that the sitelinks search box , a visual tool that allowed users to search directly within a site from search results, will be permanently removed starting November 21, 2024. This decision was made following a decline in use of this feature, with the aim of simplifying search results.
sitelink search box
What will change for websites
This change will have a global impact, applying to all languages and countries. However, it will not affect site rankings or other visual elements such as sitelinks themselves. Additionally, you will not need to change your site’s structured data: while the sitelinks search box will no longer be supported, its presence will not generate errors in Search Console reports .
What will happen to Search Console reports?
Once the sitelinks search box is removed, Google will also remove the related rich results reports from Search Console , and will no longer highlight the markup in the rich results test. However, the WebSite structured data , which is also used for site names , will continue to be supported.
What to do now?
There is no need to take any action on your site to remove the structured data related to the sitelinks search box , as their presence will not cause problems or errors in your reports. For further clarification, Google encourages users to contact the Search Central community or interact via social media.
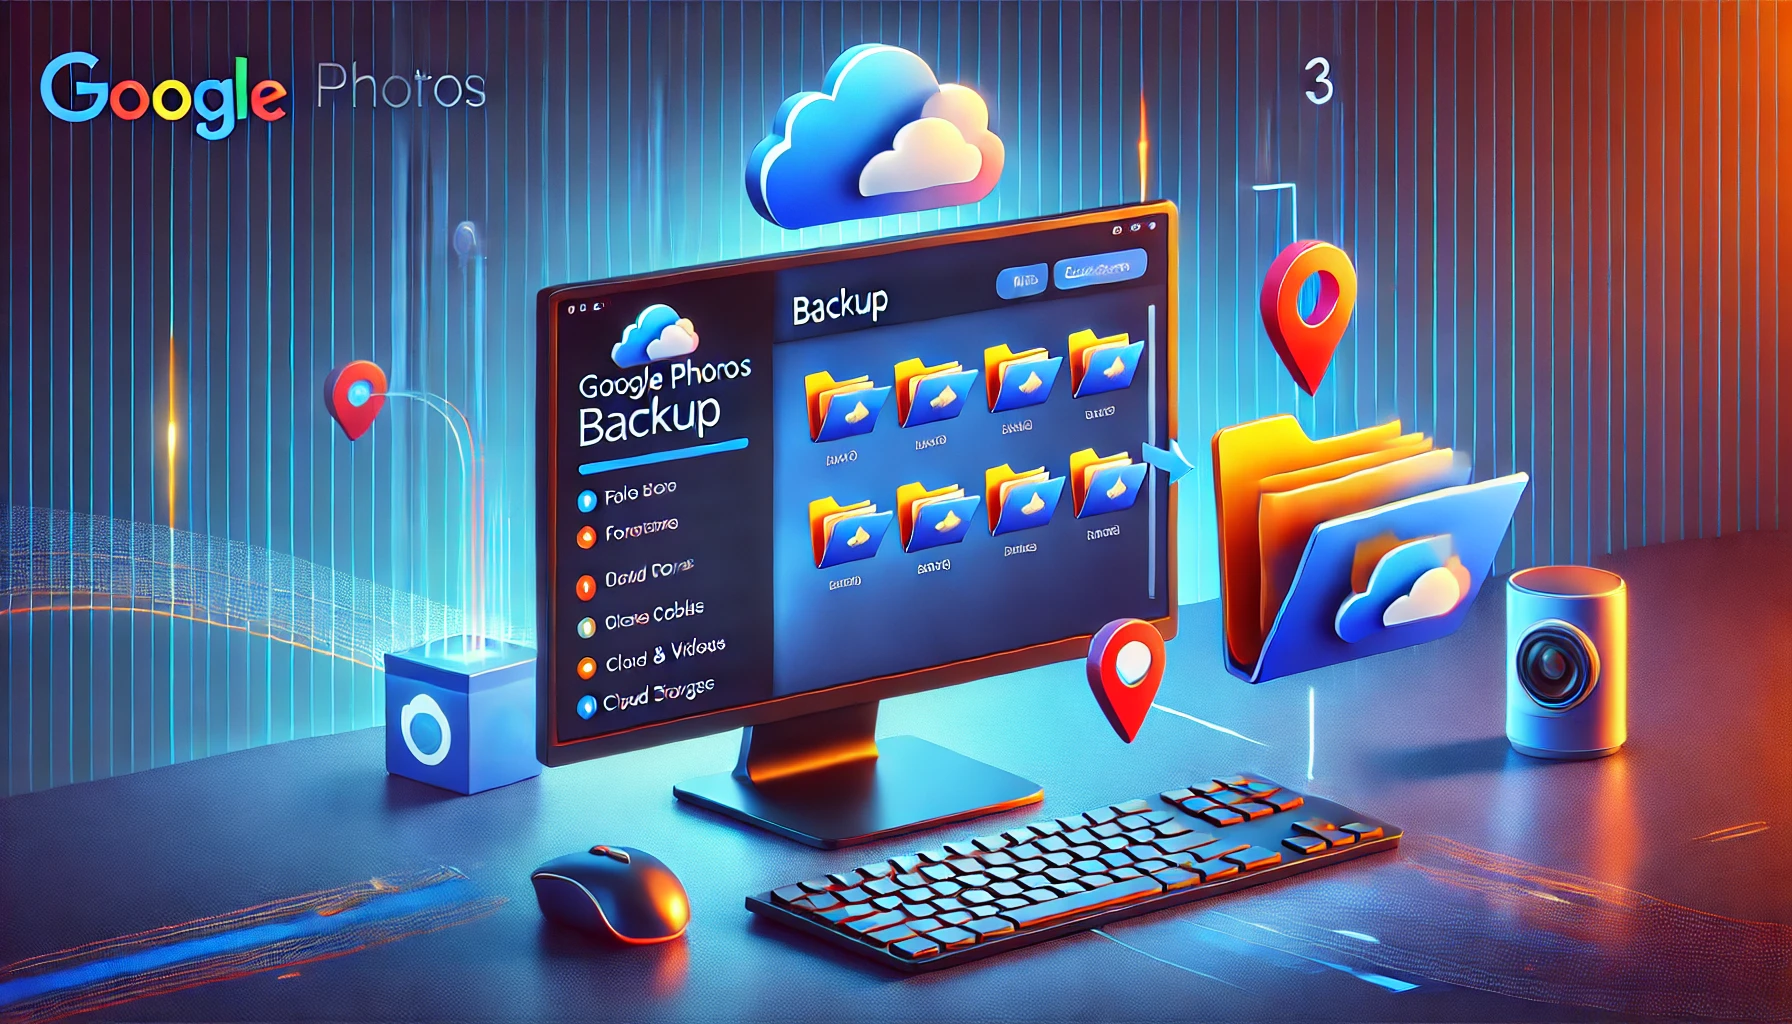
How to backup Google Photos from your phone and PC
Google Photos backup is one of the most convenient solutions to keep your media files safe. Google offers free storage for your images and videos through Google Drive .
This feature is ideal for avoiding data loss, especially when using an Android smartphone or a computer. Let’s see in detail how to back up to Google Photos from both an Android device and a PC, and how to disable Google Photos backup if necessary.
If you use an Android smartphone , backing up to Google Photos is easy. Here are the basic steps to follow to sync your photos and videos to Google’s cloud.
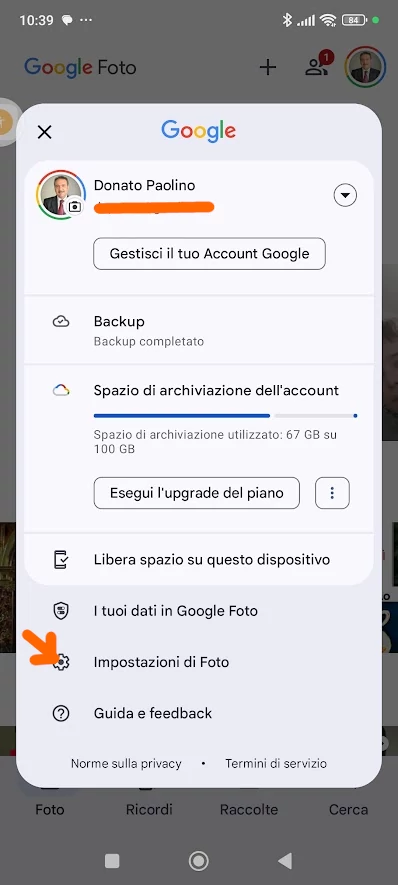
Open Google Photos : Search for the app on your device, usually pre-installed on Android smartphones.
Access Google Photos settings : Once you open the app, tap the profile icon located at the top right and scroll down to the “Google Photos settings” section.
google photos android settings
Then select “Backup”
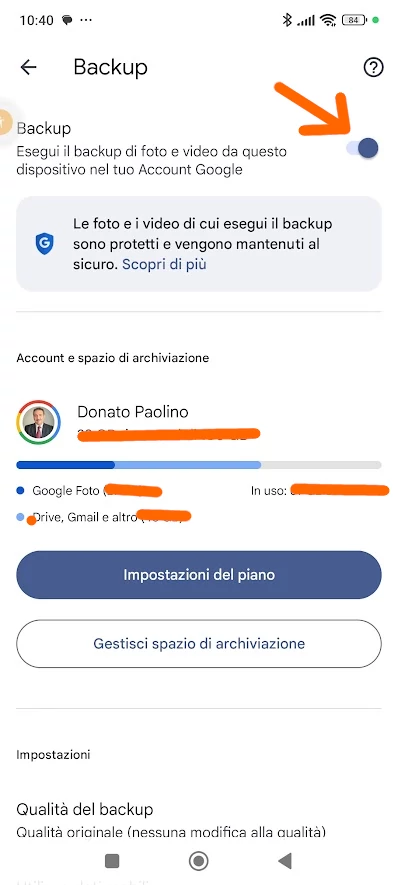
Enable automatic backup : In settings, select “Backup”. Make sure the switch is on (blue). This will back up all the folders on your device that are backed up .
Enabling the Google Photos backup toggle
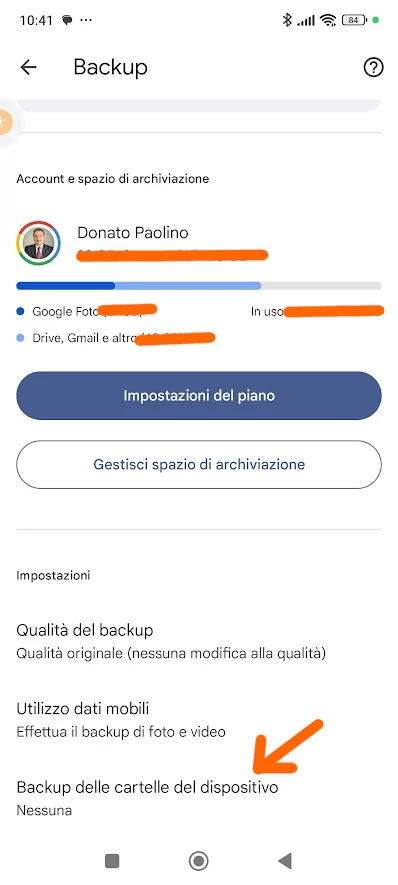
Select device folders : You can choose which folders to back up to Google . Click “Backed up device folders” to manually select the folders that contain images or videos you want to save to Google.
Select folders for backup to Google Photos
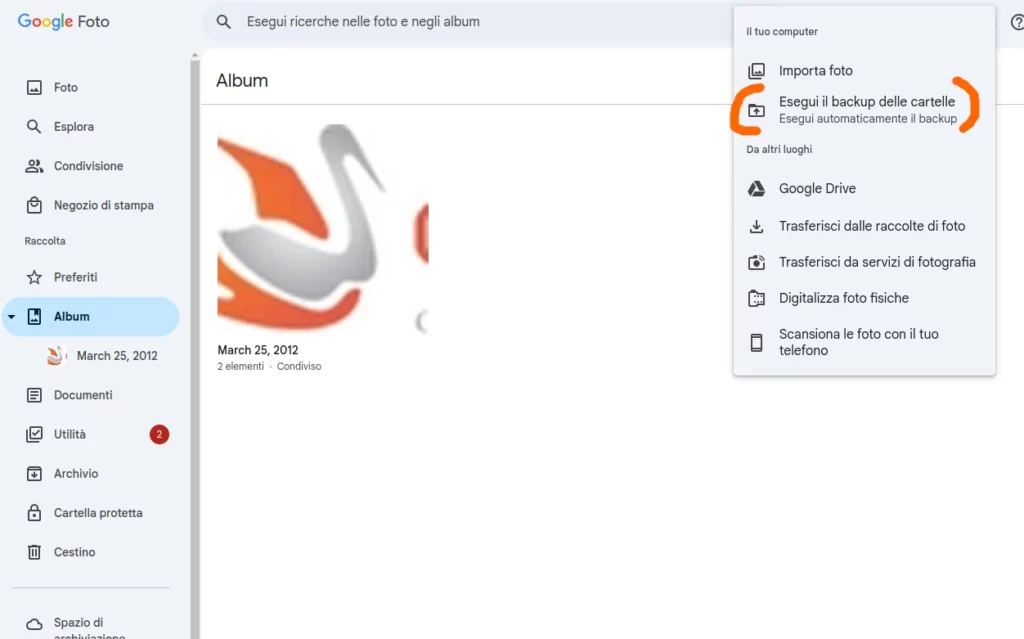
How to Backup to Google Photos from PC
Google Photos recently simplified the process of backing up photos and videos directly from your PC, thanks to a new feature available on the web version of the service.
Users can now easily select and sync folders from their computer with Google Photos, similar to the approach Google Drive already uses on the desktop. This update allows for more intuitive backup management, although it does require periodic manual intervention to update files.
How to enable folder backup on Google Photos:
Sign in to Google Photos at photos.google.com.
Click “Upload” in the app bar.
Select “Folder Backup” to choose the folders on your PC to sync.
Authorize Google Photos to proceed with the backup.
backup google photos from pc
You can manage the selected folders at any time by adding new ones or removing those already synchronized.
Note : The feature is still rolling out, so some users may not see it immediately, but it is confirmed that it is already active in Italy and only available on the desktop version of the Chrome browser. Unlike Google Drive, the backup does not happen automatically in the background, so you will need to manually update the files by periodically accessing the site.
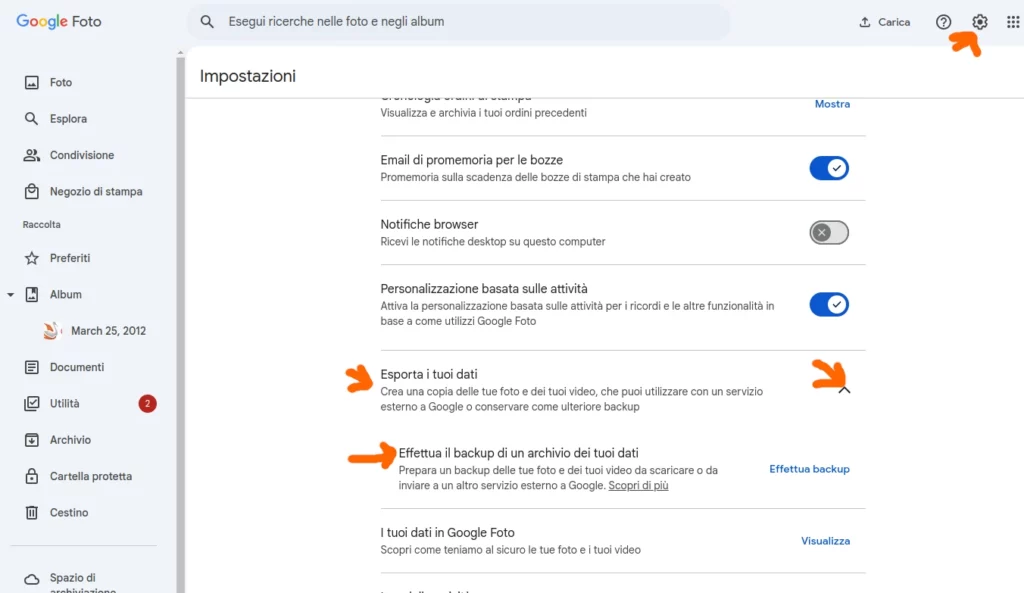
How to Export Google Photos to Your PC
Sign in to Google Photos at photos.google.com.
Click on “Settings” in the app bar (the gear).
Select “Export your data”
Click on “Make an archive backup of your data” to proceed with the backup to your PC.
How to turn off Google Photos backup
If you no longer want to back up Google Photos , you can easily turn it off on both your smartphone and PC. This can be useful for freeing up space on Google Drive or if you prefer to manually manage your images.
From Android smartphone
Open the Google Photos app : On your Android smartphone , open the app again.
Access Settings : Tap the profile icon in the top right and scroll down to “Backup”.
Turn off backup : Once in the “Backup and Sync” section, turn off the switch. This will stop the automatic backup and allow you to manually manage your files.
From PC
Google Photos Website : If you use the Google website to upload files, simply stop the manual upload.
If you have enabled automatic backup : To disable Google Photos on PC, go to the Google Photos website, click on “Upload”, then select “Back up folders” and disable all the folders previously selected.
How to Free Up Space on Google Photos
Storage space on Google Drive is shared with Google Photos, so it’s important to manage your backup properly so you don’t run out of space. To free up space , you can:
Delete large photos : You can delete photos or videos that take up a lot of space.
Change image quality : In the backup settings you can choose whether to upload photos in “High Quality” or “Original”. The “High Quality” option compresses the images slightly to save space.
Use the “Free up space” feature : Google Photos offers an option in settings called “Free up space,” which deletes photos already backed up by Google from your device, without deleting them from the cloud.
Manage backup across multiple devices
The advantage of Google Photos backup is that you can access your images from any device, as long as you are signed in to your Google account. This makes it very easy to transfer photos from one device to another or share media files without using physical storage.
Why might it be convenient to disable Google photo backup?
Disabling automatic backup on Google Photos can make sense for a variety of reasons, depending on the needs and preferences of users. Here are some of the main reasons why you might want to disable it:
1. Save storage space
Google Photos offers limited free backup space (up to 15 GB shared between Google Drive, Gmail, and Google Photos). If you take a lot of photos or upload large files, your storage will fill up quickly, forcing you to sign up for a paid Google One plan. By turning off backup, you can be more mindful about which photos are saved to the cloud and which are kept locally.
2. Save mobile data
If you use Google Photos on mobile, automatic backup can quickly eat up your data plan, especially when uploading high-quality photos and videos. By turning this feature off or setting it to work only on Wi-Fi, you can significantly reduce your data usage.
3. Privacy and Security
Many users may not be comfortable with the idea of automatically saving all their personal photos and videos to a cloud service. Turning off backup can reduce the risk of accidentally exposing sensitive or private content, especially if you are unsure about the security of your Google account.
4. Control over uploaded content
By turning off automatic backup, you have more control over which photos and videos are uploaded to Google Photos. This can be useful if you don’t want to keep temporary photos or screenshots, or if you want to be more selective about what you upload.
5. Device performance
The automatic backup process can affect the performance of your device, especially in terms of battery and connection speed. Disabling backup prevents your device from constantly working to upload photos and videos to the cloud.
6. Personal organization
By turning off automatic backup, you avoid uploading all your photos without a filter, allowing you to better organize your albums, delete duplicates or unwanted images before uploading them to Google Photos.
Questions and Answers
How can I backup my photos to Google Photos from Android? Open Google Photos, go to “Backup & Sync” and turn the option on.
Can I choose which folders to back up to Google Photos? Yes, in the settings you can manually select which folders to sync.
How to stop backing up to Google Photos from my PC? Go to Backup and Sync, click “Preferences” and turn off sync.
Is it possible to free up space by deleting photos that have already been backed up? Yes, Google Photos allows you to delete photos from your device that have already been uploaded to the cloud.
Do photos uploaded in “High Quality” take up space on Google Drive? No, “High Quality” photos do not count towards your storage limit.
How do I free up space on Google Photos? You can delete large photos or use the “Free up space” function in settings.
Can I use Google Photos to backup on an iPhone? Yes, the Google Photos app is also available for iOS devices.
What happens if I turn off Google Photos backup? Photos will no longer be uploaded automatically, but you can still upload them manually.
How do I access my photos on Google Photos from another device? Simply sign in to Google Photos with your account from any device.
Can I restore deleted photos from Google Photos? Yes, deleted photos go to the trash for 30 days before being permanently deleted.
A customer asked to implement a third-party service on his website under our site management (in this case it is Fidelo).
By inserting the scripts provided by this software, when you then publish the page and check with the console, the script appears changed with the addition of the parameter “&%3B” in place of the original “&” present in the provided script.
Script provided by third party software with the “&”Resulting script with &%3B parameter resulting from F12 console
This small change does not allow the optimal execution of the script provided on the web page.
In this article we provide the solution we have implemented
What is the parameter &%3B?
The parameter “&%3B” often appears in URL links due to incorrect character encoding “&“. To remove it from a script, you need to decode the URL and remove the unwanted parameter.
How to remove it in Javasript?
Here are the steps to do it in JavaScript:
Decode URL : Use decodeURIComponent()to transform the encoded URL into readable format.
Remove unnecessary parameters : If you need to remove a specific parameter, you can manipulate the URL string.
Here is an example script:
// Let's assume this is the URL with the wrong parameter
let url = "https://example.com?param1=value1&%3Bparam2=value2";
// Decode URL
let decodedUrl = decodeURIComponent(url);
// Remove 'amp;' and replace it with the correct '&' symbol
let cleanedUrl = decodedUrl.replace("amp;", "&");
// Final output of the clean URL
console.log(cleanedUrl);
This script:
Decodifica l’URL.
Rimuove amp3b, ripristinando il simbolo & nella posizione corretta.
How to remove &%3B in WordPress
To remove &%3B from a URL in WordPress, you can follow different paths depending on where the problem arises. Here are some common solutions:
1. PHP functions in the file functions.php
You can add a function in your theme’s functions.php file to remove or fix the parameter &%3B from URLs.
Here’s an example of code that decodes the URL and removes it &%3B before it’s displayed:
// Add this function to your theme's functions.php
function clean_amp_param($url) {
    // Decode the URL
    $decoded_url = urldecode($url);

    // Remove 'amp;' and replace it with '&'
    $cleaned_url = str_replace('amp;', '&', $decoded_url);

    return $cleaned_url;
}

// Apply the function to URLs generated by WordPress
add_filter('the_permalink', 'clean_amp_param');
add_filter('wp_get_attachment_url', 'clean_amp_param');
This function:
Decode the URL using urldecode().
Replace amp;with the correct symbol &.
Use the filter the_permalinkand wp_get_attachment_urlto apply it to URLs generated by WordPress.
2. Adding a plugin
If you don’t want to edit your theme files directly, you can use a plugin like “ Code Snippets ” to easily add PHP code without editing the functions.php.
Install the “Code Snippets” plugin from WordPress.
Create a new snippet with the above code.
Save and activate the snippet.
3. Check the links in the contents
If the error &%3B appears in links within your site content (like posts or pages), they may have been added manually or generated by shortcodes or plugins. You can do the following:
Search and Replace : Use a plugin like Better Search Replace to search the contents of the database &%3B and replace it with &.
4. Check AMP plugins
If you are using a plugin that handles AMP pages, check your plugin settings or update the plugin itself, as this could be the source of the problem.
5. Cache and CDN
Sometimes this type of error can be caused by caching or a CDN manipulating URLs. Make sure to clear your WordPress cache and if you use a CDN, check for problematic rewrite rules.
Google Analytics: Is adding a user difficult for you? I’ll explain how to add users to Analytics.
GA4 is a fundamental tool for monitoring the performance of your website .
In a digital marketing team, it is often necessary to share access with other team members or external collaborators. If you are wondering how to add multiple users on Analytics , this guide will help you understand how to do it easily and safely.
We’ll walk you through the steps to add a user to Analytics , manage permission levels, and maintain control over access to your data.
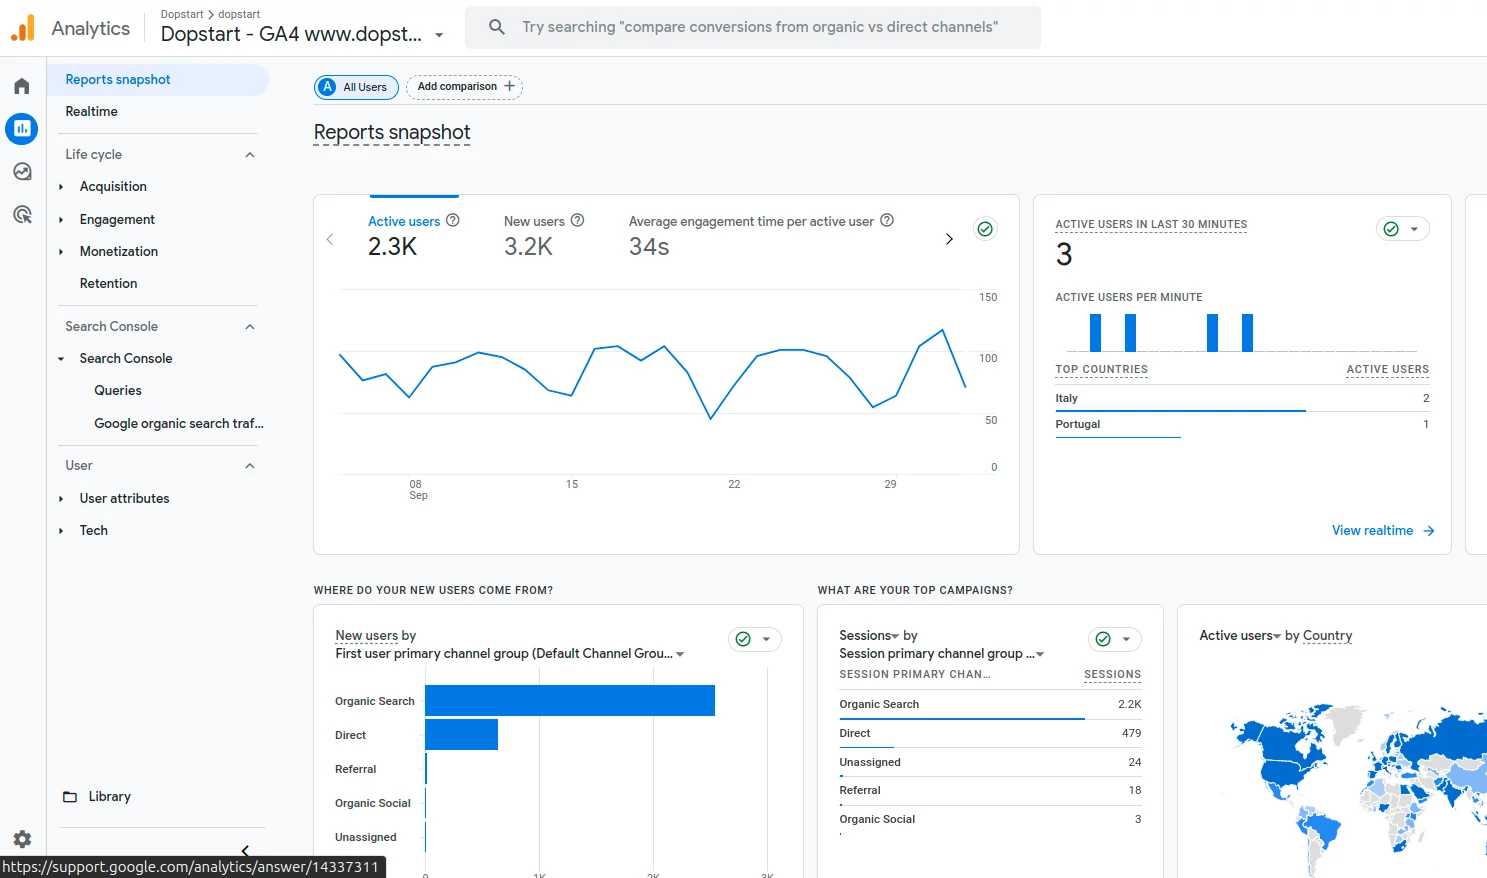
To add users to Google Analytics , the first step is to log in to your Google Analytics account .
You will need to use your Google credentials, so make sure you are logged in to your Google account associated with your Google Analytics account. Once inside the platform, you will have access to the main dashboard.
Snapshot Report in Google Analytics
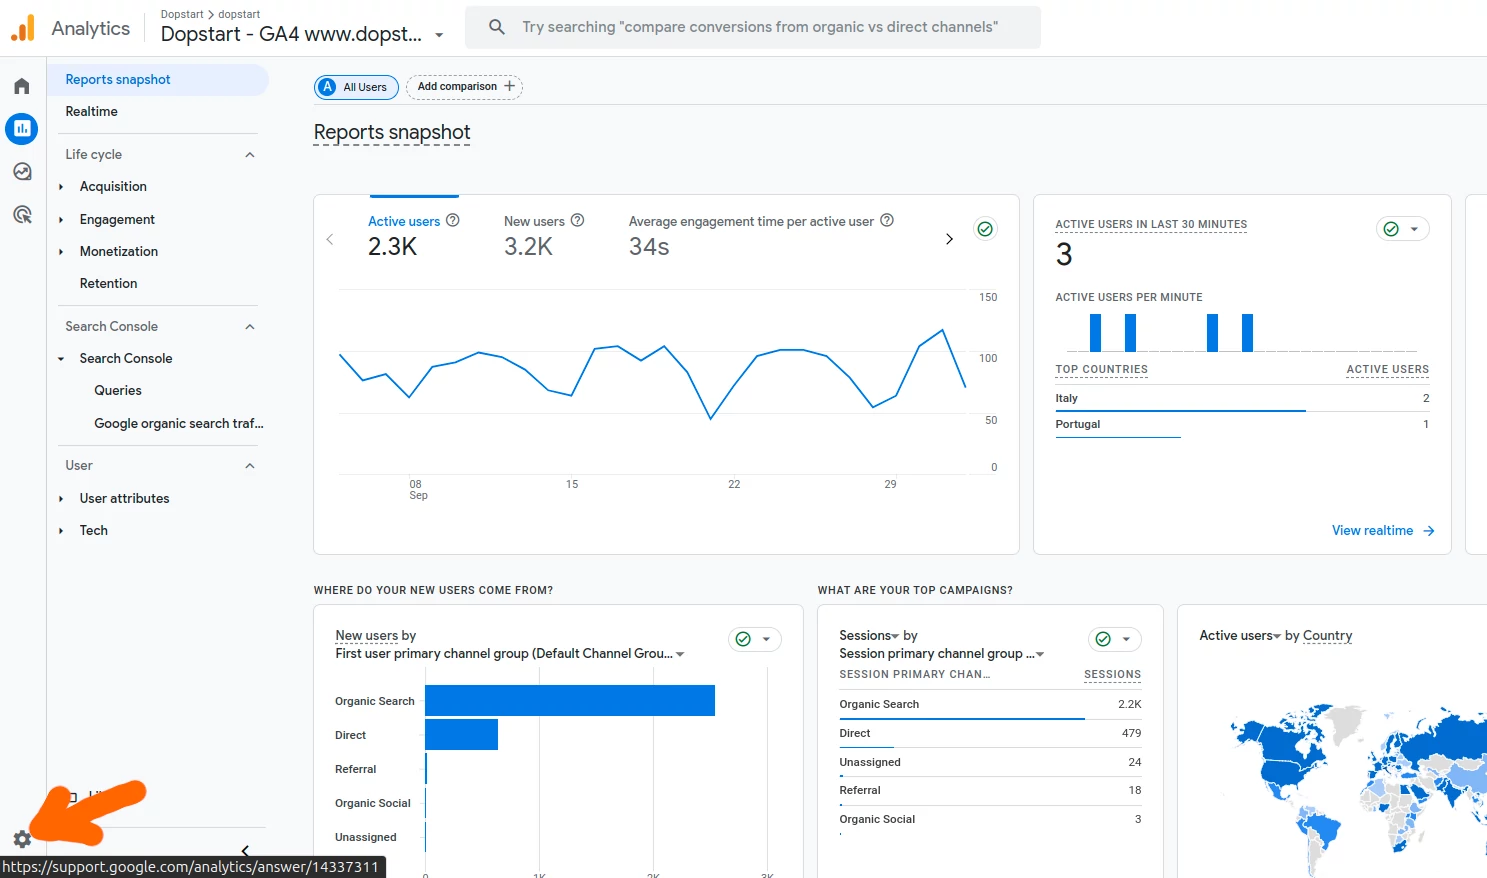
Navigate to user management
After logging in, you will be presented with the main Google Analytics screen. From here, to add new users , you will need to navigate to the administration section, which is located at the bottom left of the screen.
Admin Button on Google Analytics
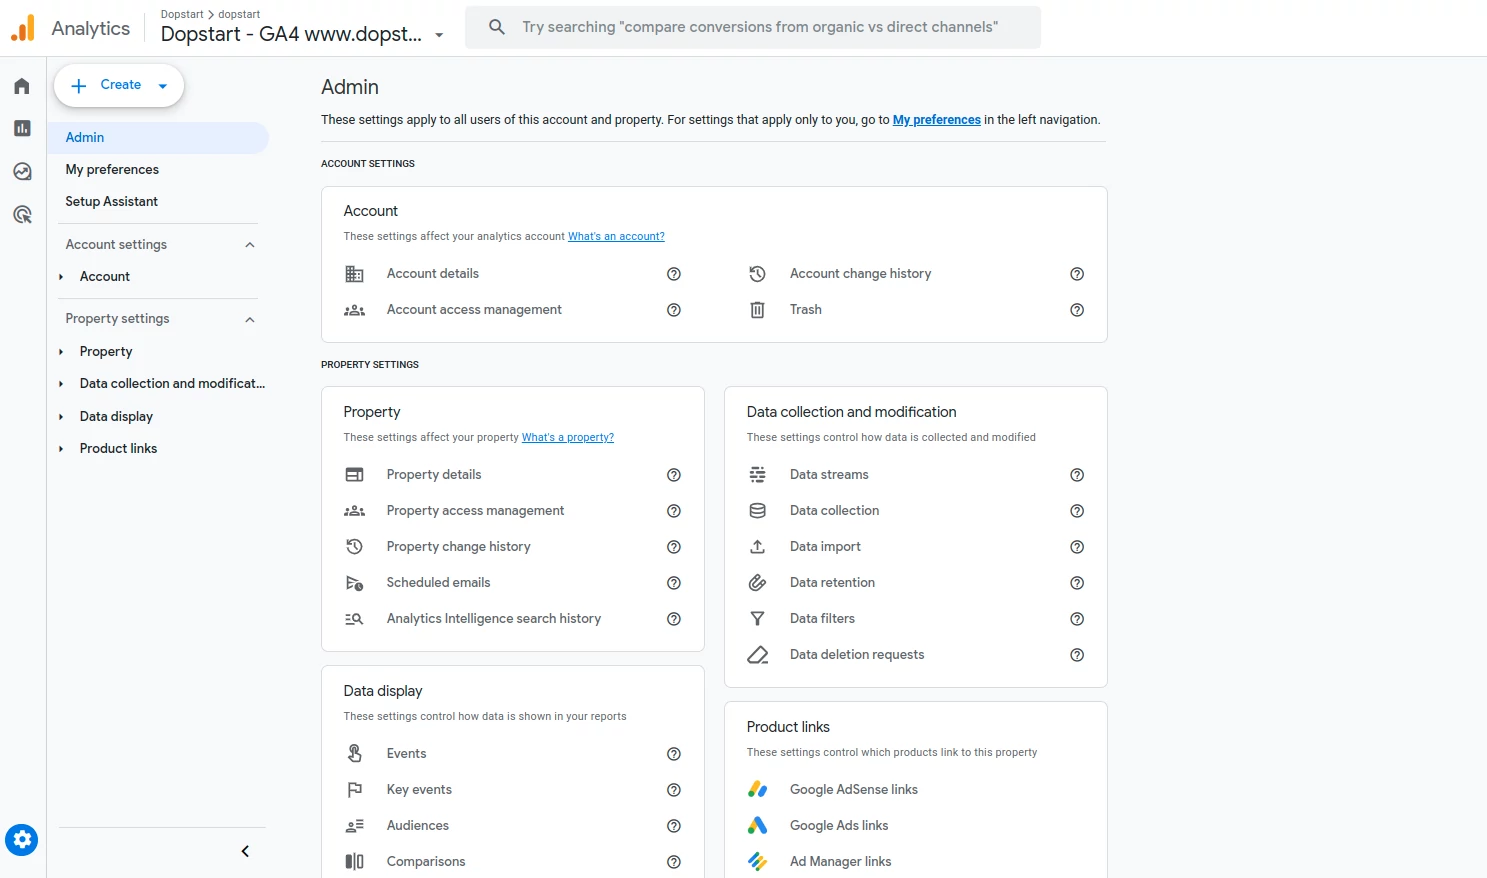
Here, you will see two main columns: Account , Property as well as others (Data View, etc.). Each column represents a different access level within Google Analytics.
Google Analytics Admin Screen
The first step is to click on the Account column if you want to give access to all data (then click on Account accessmanagemet ), or you may choose to give access only to a specific property or view. In the latter case click on Property access management ).
This second option is recommended.
Account Access Management and Property Access Management on Google Analytics
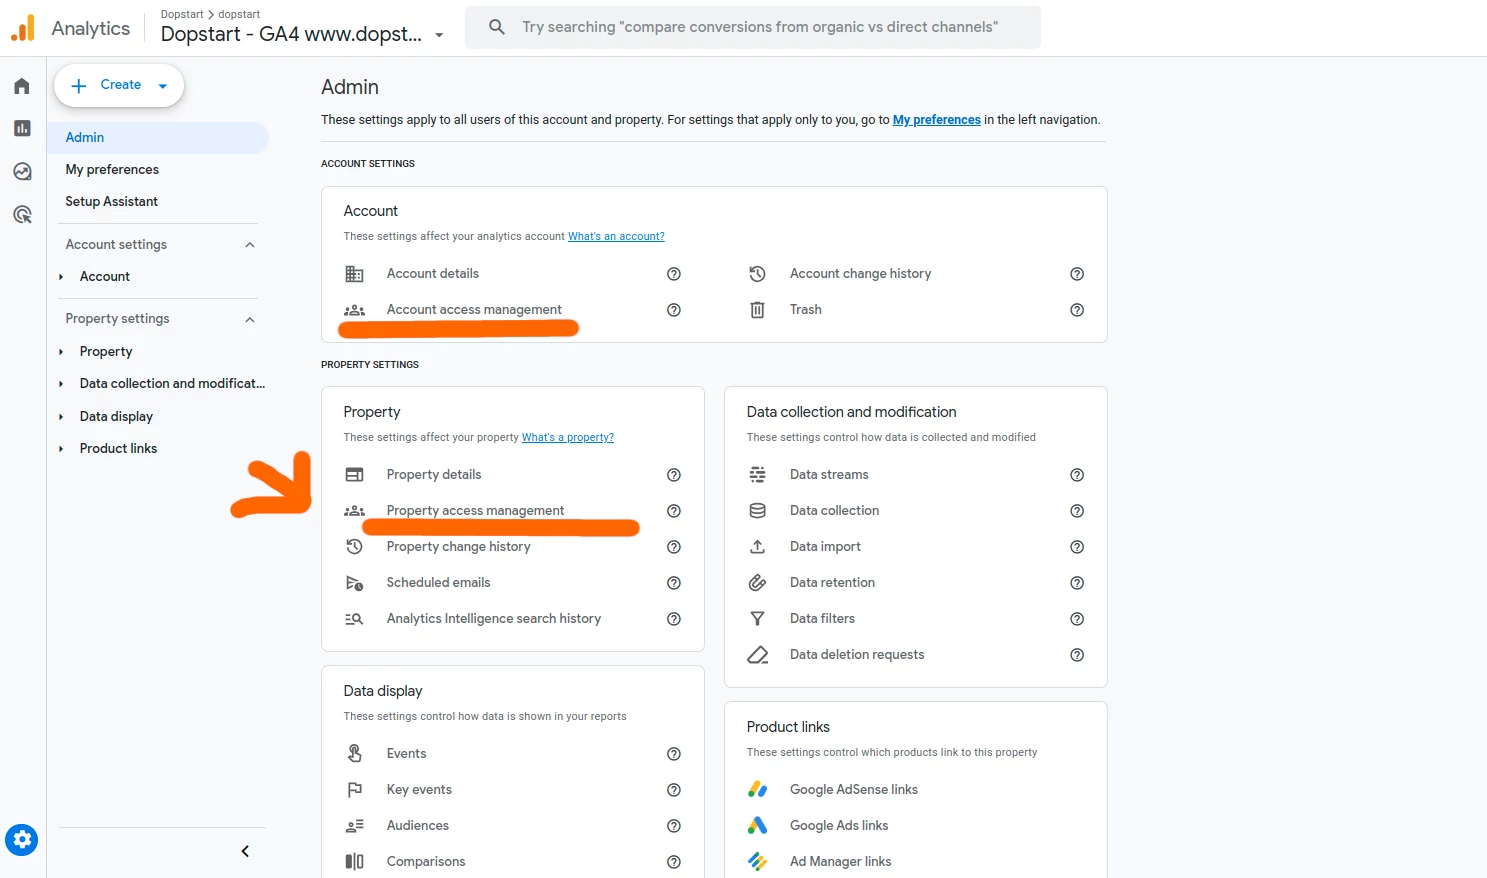
Add a new user
Once you enter the Property Access Management section , you will see a list of users who currently have access to the account or property. At this point, to add a new user , you will need to click on “Add” in the top right corner which may be displayed with a “+” sign. This button will allow you to enter the details of the new user.
Button to add users on Google Analytics
You will be asked whether you want to add individual users or groups of users.
We select Add users and a page will open where you will be asked to enter the email address of the person you want to add. The address must be associated with a Google account , otherwise they will not be able to access the platform. Then assign a role and finally click on “Add” button.
Steps to add user in Google Analytics
Set permission levels
Google Analytics allows you to assign different permission levels based on the needs of the new user. When you are about to add a user to Analytics , you will have several options to choose from:
Administrator : Has complete control of the property
Editor: Can edit all data and settings for property. Cannot manage users.
Marketer – Can edit audiences, conversions, attribution models, lookback windows, and events for the property. Includes the Analyst role.
Analyst – Can create and edit shared resources, such as dashboards and annotations, for the property. Includes the Viewer role
Viewer – Can view data and report configuration settings for the property
None – No role assigned
There are further limitations to the data: in particular, metrics relating to costs and revenues can be excluded.
Depending on your needs, you can choose the right permission level for the new user. For example, if the person only needs to read the data without making any changes, it may be sufficient to select the “Read and analyze” option. If you want the user to have full access, you can assign the “Edit” or “User management” level.
Confirmation of adding new user
Once you have entered the new user’s email address and chosen their permission level, you will have to confirm by clicking on “Add user “. At this point, the user will receive an invitation email that will allow them to access Google Analytics with the permissions you have assigned.
Manage existing users and remove access
In addition to adding users to Google Analytics , you may also need to manage or remove existing users. This can always be done from the User Management section , where you can see all users with access and their permissions.
If a user is no longer part of the project, you can remove them by clicking the trash can icon next to their name. Remember to review access periodically to ensure only the necessary people have access to your website data .
Adding Multiple Users to Analytics
If you need to add more users to Analytics , you can repeat the process as many times as needed. There is no immediate limit to the number of users you can add, but make sure you manage permissions properly to avoid security issues or data analysis errors.
error: Content is protected !!
Gestisci Consenso
Per fornire le migliori esperienze, utilizziamo tecnologie come i cookie per memorizzare e/o accedere alle informazioni del dispositivo. Il consenso a queste tecnologie ci permetterà di elaborare dati come il comportamento di navigazione o ID unici su questo sito. Non acconsentire o ritirare il consenso può influire negativamente su alcune caratteristiche e funzioni.
Funzionale
Always active
L'archiviazione tecnica o l'accesso sono strettamente necessari al fine legittimo di consentire l'uso di un servizio specifico esplicitamente richiesto dall'abbonato o dall'utente, o al solo scopo di effettuare la trasmissione di una comunicazione su una rete di comunicazione elettronica.
Preferenze
L'archiviazione tecnica o l'accesso sono necessari per lo scopo legittimo di memorizzare le preferenze che non sono richieste dall'abbonato o dall'utente.
Statistiche
L'archiviazione tecnica o l'accesso che viene utilizzato esclusivamente per scopi statistici.L'archiviazione tecnica o l'accesso che viene utilizzato esclusivamente per scopi statistici anonimi. Senza un mandato di comparizione, una conformità volontaria da parte del vostro Fornitore di Servizi Internet, o ulteriori registrazioni da parte di terzi, le informazioni memorizzate o recuperate per questo scopo da sole non possono di solito essere utilizzate per l'identificazione.
Marketing
L'archiviazione tecnica o l'accesso sono necessari per creare profili di utenti per inviare pubblicità, o per tracciare l'utente su un sito web o su diversi siti web per scopi di marketing simili.